Linux Server Setting Up SSH Key Login In Windows Client
In this tutorial, I will be going through how to manually set up a SSH Key Login for your Linux servers. The commands for this tutorial will be based on CentOS 7, but can be easily applied to other distributions.
There will be three parts to this tutorial :
- Generating your SSH Key (Public & Private Key) with puttygen
- Setting up SSH Key Login on your Linux server
- Logging in using SSH Key with putty
If you already have a public & private key, you may skip over to part 2 of the tutorial.
Generating your SSH Key with puttygen
- Ensure you have putty installed (puttygen comes along with it). Otherwise, download here
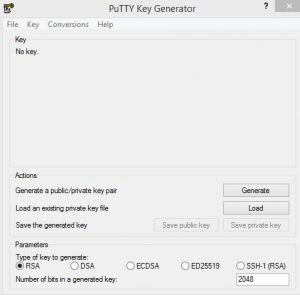
- After you have installed it, run puttygen.exe and a window as shown below will appear
- Click on the ‘generate’ button as shown below
- Move your cursor within the blank area of the window as instructed in the program
- After you finished moving your mouse, you will be shown this screen
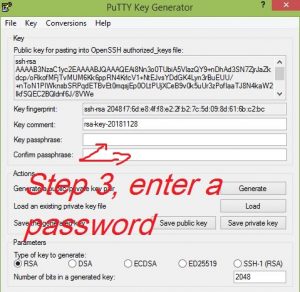
- Enter your password
- Save or export your public and private key to a secure folder.

puttygen-step4-window - If you ever need to see your keys again, you can load the file into putty to see it.
- YOUR PRIVATE KEY MUST BE KEPT A SECRET AT ALL COSTS !
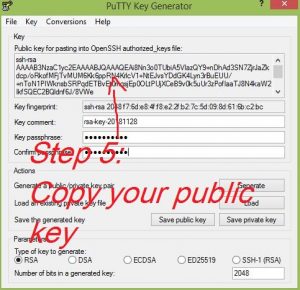
- Copy your public key (right click the textarea -> select all -> ctrl+c)
Setting up SSH Key Login on your Linux server
-
- SSH into your Linux with putty (its recommended not to use root, but another user)
- Create a SSH folder if it does not exist yet
- Create SSH directory :
mkdir ~/.ssh - Create authorized_keys file :
touch ~/.ssh/authorized_keys - Change ssh folder permissions :
chmod 0700 ~/.ssh - Change authorized_keys file permission :
chmod 0644 ~/.ssh/authorized_keys
- Create SSH directory :
- Create an entry in authorized_keys file
- Edit authorized_keys file :
vi ~/.ssh/authorized_keys - Press the INSERT key to swap to edit mode (previously read-only)
- Right click anywhere in your putty window and it should paste the public key you copied earlier
- Save the file by entering the following
- Press ESC key
- Type ‘:wq’ (without quotes)
- Press ENTER key
- Edit authorized_keys file :
- Now we should disable normal password based authentication
- Edit /etc/ssh/sshd_config :
vi /etc/ssh/sshd_config-
-
- Scroll down till you see the following line
PasswordAuthentication Yes
- Press the INSERT key to enable editing mode
- Change the ‘Yes’ to ‘No’, so it should ultimately look like the image shown below
- Save the file by entering the following
- Press ESC key
- Type ‘:wq’ (without quotes)
- Press ENTER key
- Scroll down till you see the following line
- Restart your SSH service :
service sshd restart
-
-
- Edit /etc/ssh/sshd_config :
Logging in using SSH Key with putty
- Open up putty.exe
- Fill in your hostname and port
- Browse to Auth section / configuration
- Load your private key
- Go back to Session section and open the connection
- Enter whoever you wish to login
- Enter your password

putty-sshlogin-step6 - Congratulations, you are logged in ! (assuming your passphrase was right)
CONCLUSION
Using SSH Key as your authentication method is more secure, as it is a double-layer authentication (your private key, and your password/passphrase). It is not that hard to setup, and once you familiarized yourself with it, it becomes second nature to do so.


Be First to Comment